Wednesday, July 25, 2012

Liberty and Linen

....or flowers for Wednesday!

Recently I have been pulling out some old projects and working towards finishing them.

Today I am revisiting my One Flower Wednesday project.  In 2010 I started making hexagon flowers with Karen of Journey of a Quilter. At the end of 2010 I had 21 one inch hexagon flowers made from Liberty Tana lawn fabric. I had lots of fun fussy cutting all those fabrics. It has taken me quite a while to get them back out and find a background fabric.
Here they are appliqued on to a piece of linen.


I decided the layout needed something extra, so I have made 10 more hexie flowers. I used the same fabrics as before, but fussy cut some of them from different sections of fabric. I love the pansies on the bottom hexie. :) I plan to use these 5/8 inch hexagons with vines and leaves in 2 corners.


I am still deciding on how to arrange them.


There are still lots of leaves to be made also.


While we are speaking of Liberty fabrics, look what just arrived this afternoon!!


A small selection from the Liberty Lifestyle collection - Bloomsbury Gardens.There are 55 fabrics in the whole collection: 11 designs in each of 5 different colours. These fabrics came from here. The fabrics are a typical patchwork fabric weight with new Liberty designs. I am looking forward to playing with them! :)

It has been a while since I posted any photos of flowers from my garden. Here are some to finish up.


Violas and lobelia planted with spring flowers bulbs and below the first miniature daffodil.


Saturday, July 21, 2012

Needleturn Applique Tutorial Part 2


...with lots of other applique tips!


Above are all the Roseville Album blocks I have made so far. The block I am working on is the top right hand block.

When selecting fabrics I have 2 fabrics I have included in every block.


I have a selection of fabrics I choose from. Some are chosen because they are already in adjacent blocks and some because I can fussy cut them. Fabrics with flowers, circles or curves in the design that match curves in the pattern pieces are chosen.

The 2 fabrics below can make great leaves, the below left fabrics can be fussy cut for flowers and there are lots of circles in the design of the below right fabric.


This last one has flowers, swirls and curves all of which can be fussy cut.


After choosing which fabrics I will use for each pattern piece I iron the freezer paper on the front of the fabric and cut out each piece roughly. I leave the smaller circles till last. At that point I can see which colours can be used to "balance" the look of the block.


The next step is to trace onto the fabric around each piece of freezer paper. For this I use a white lead in my pencil. If a fabric is very pale I substitute a grey lead. Having a larger seam allowance around the freezer paper makes tracing easier and there is less chance of frayed edges.


The first pieces to the appliqued to the background are the stems. These are 1/4 inch bias strips which I made earlier.
To secure the stems to the beackground ready for stitching I usually choose from using either short applique pins or a tiny amount of water soluble glue. There are advantages and disadvantages in both methods, so it is really personal preference. Give both ways a try and see which way you like.


 In order to place the stems in the correct position I place the background under the clear plastic overlay I prepared in the previous post. I tape the top of the overlay to a large cutting mat so it doesn't shift.


Carefully line up the stitching lines on the background fabric with the placement lines marked on the overlay.


 Now I lift the overlay, slide under the fabric and pin or glue it in place.

Below I have pinned the centre stem and glued the 2 other stems.


 With the overlay on......


...and without....


I use a very fine thread for my applique. I find YLI silk in taupe (235) is a good choice because the stitches "disappear" into the fabric. I use a sharps or a fine applique needle (Clover gold eye applique no. 10 is a favourite as well as the Roxanne's sharps in the photo below.)


When stitching down the stems I take tiny stitches (maybe 1/8 inch or 2 mm in this case.) and bring the needle up in the fold of the fabric, like below. Stitch the inside curves first, then the outer edge of the curve. Smaller stitches are used on tinier pieces of fabric, or when stitching some curves. ( for example, the convex curves to and from the point in the top of a heart shape.)


Now I trim the seam allowances on each piece back to about 1/8 inch. Place the background under the overlay again, line it up, then slide under one piece at a time. Pin or glue down each of the pieces. If you are using glue you only need a tiny dot in 2 or 3 places to hold down the fabric. Take note of any layering. Where pieces overlap the bottom pieces are applied first.

Here where there are 2 stems that overlap the bottom stem is stitched down completely before the top stem is pinned. I leave all the freezer paper on each piece until I am ready to stitch it down. (sometimes they do fall off, that doesn't really matter!) I have placed just a few of the pieces on the background to start with.


Now we can start stitching down the pieces.

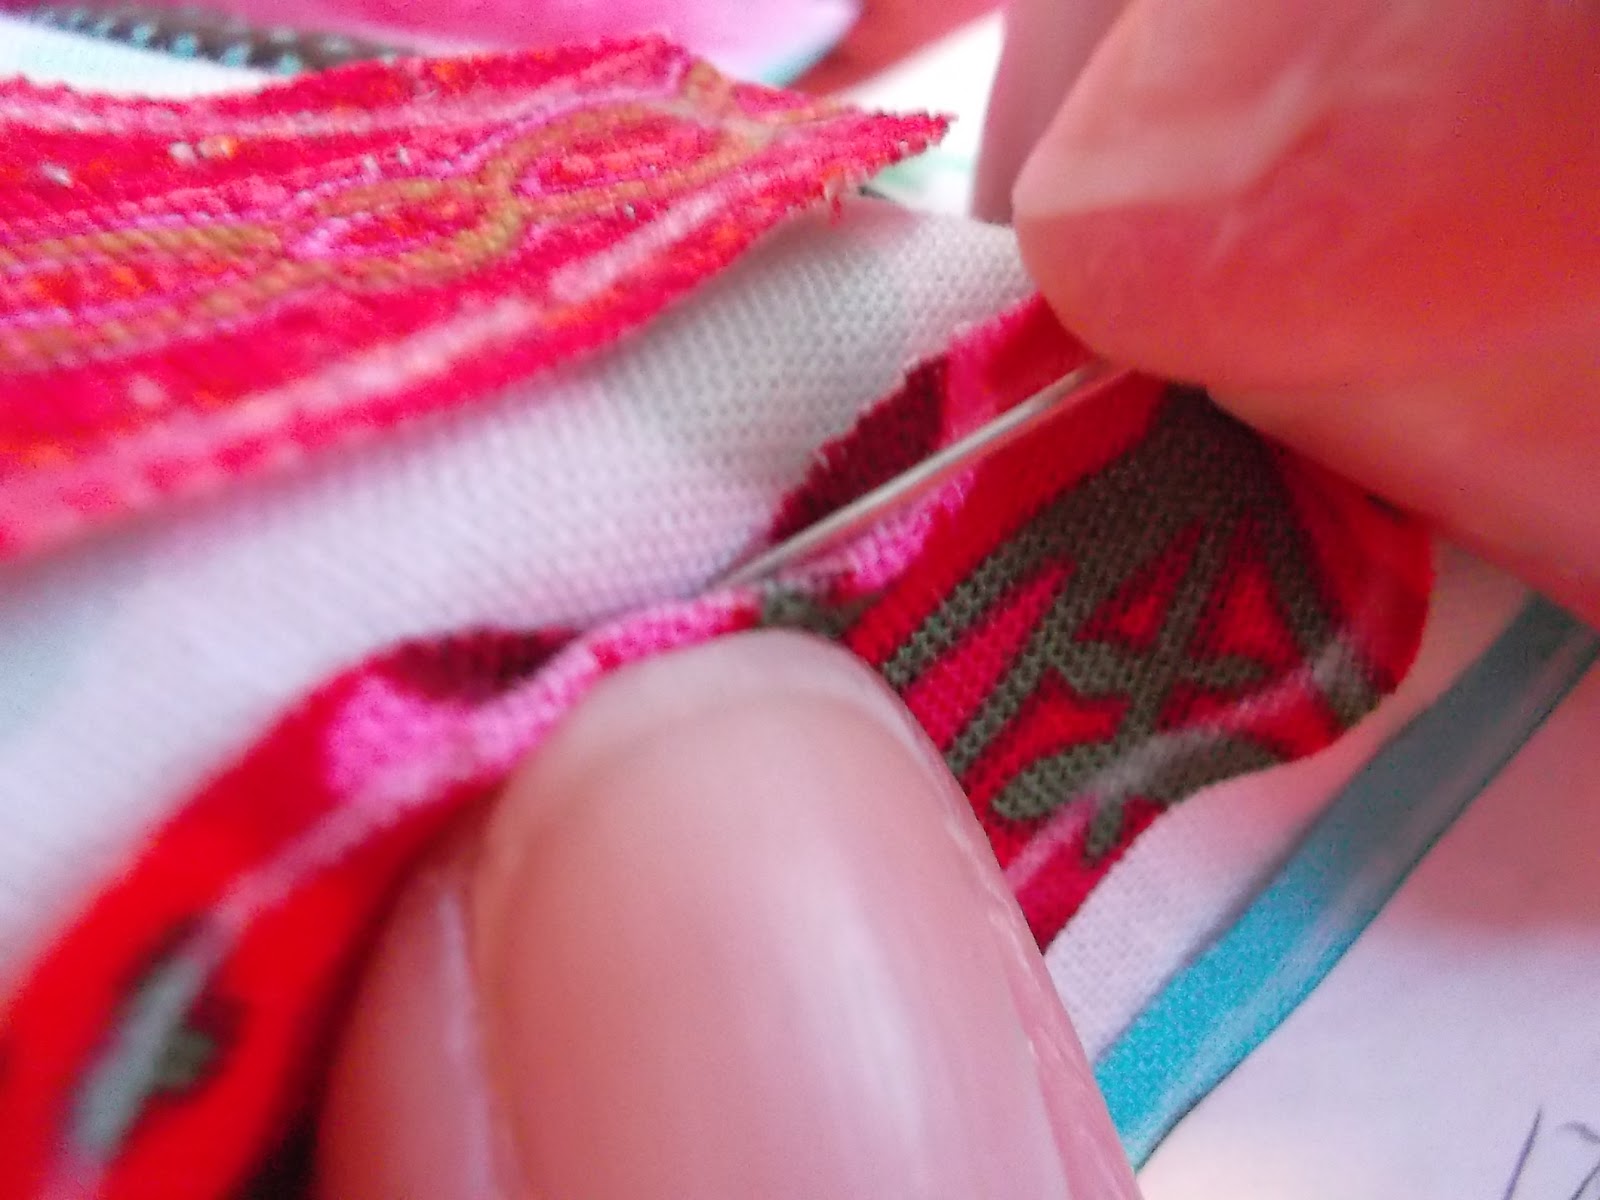
To needleturn applique firstly place the point of the needle in the seam allowance and push the fabric towards your thumb, so the fabric lifts and curves...


Tuck under just enough fabric to hide the white line and hold it gently with your thumb.


Now I take my needle and thread (which has a tiny knot in it) and come up from the back through the background and into the folded edge. To take the first stitch, take the needle down into the background right next to where I came up and just under the folded edge, then come back up about 2mm along into the folded edge.


For the next stitch again place the point of the needle in the seam allowance and gently push the fabric under till it folds along the white line.


Hold the fabric with your thumb and take the next stitch, again going down right next to the previous stitch and coming out in the fold.


Repeat around the shape.

When all those pieces are sewn down, slide the background under the overlay, making sure it is aligned correctly, and pin or glue the next lot of fabrics. Where fabrics overlap, stitch one piece, then use the overlay to place the next layer before stitching down that piece.

I hope all the step and photos are clear and I have included enough information and photos. I am happy to try to answer any questions.

Happy sewing!!!!

Wednesday, July 11, 2012

A Tutorial. My preparation technique for needleturn applique.

During the last few years I have been reading about lots of ways to prepare a block for applique. There are probably as many ways of applique preparation as there are appliquers! I have tried several ways of doing things and decided which combination of steps work best for me.
The following steps outline my preparation of a block for the Roseville Album quilt. I do basically the same steps for the Friends of Baltimore blocks.

Materials used.

Background fabric
Small amount of matching thread, scissors and needle
Lead pencil
Transparent plastic
Permanent marker
Freezer paper and paper scissors.


I have all my background fabrics cut into the required block sizes before I do anything else. As I cut each piece out I place a pin in the top right hand corner of each piece of fabric. That way I always know which side is the right side and any background patterns will always run in the same direction.

My first step is to take a pre cut piece of the background fabric and finger press horizontally and vertically to mark the centres. These lines are used to accurately line up the fabric with the pattern when placing applique pieces.


Next I mark these lines again by making a large running stitch along the lines. It is important to use a thread that is close to the colour of the background so there is no chance of any colour from the thread being transferred to the background when the thread is removed. I tend to use up almost finished reels of thread for this job.


Now take out your pattern and number every single piece. Flowers are sometimes made with several layers. Number every one of them. Some pattern designers will have already done this step for you. If you don't want to write on the original, make a copy and use that to number the pieces. Be careful that the copy is accurate (some photocopiers can disort a copy), especially if you are using the copy for the next few steps.


Next I prepare the overlay. This is a clear sheet of plastic, a little larger than the background piece, that is used to help accurately place all the applique pieces. I use clear pieces of A4 plastic that can be used in a photocopier. (I just happen to have some here) If your pattern is presented as A4 sheets you can photocopy the pattern on to photocopier tranparencies. I get this step done at Officeworks here in Australia. (I tried this step with the printers here at home.....one had ink that smudged as soon as it was touched. The other distorted the plastic because it got too hot. For a simple design with large pieces this may not be a big problem)
You can also use the plastic sold as table protectors. That way you can cut the plastic any size you need.

My steps for the Roseville Album are:

1. Tape together the A4 transparent sheets to make a piece large enough to overlap the edges of my background fabric.
2. Place the transparent sheet over the original pattern and mark the placement lines. I mark just the edges where they intersect and the centre.


I use the sharpie because it doesn't rub off and it has both a fine and a wider tip.
3. Now trace all the pattern pieces remembering to number each one using the same numbers as before.


Now the overlay is ready and it is time to prepare all the freezer paper pieces.

Take the original pattern and your freezer paper and carefully trace over each pattern piece, again remembering to number each one. (you can see in the right hand photo below I forgot to number the piece on the bottom right!!)


You will notice the list of numbers in the bottom left hand corner of the second photo above. They are the pattern pieces that are small circles. For those pieces I don't make a freezer paper template. I use mylar circles to make those pattern pieces.

Lastly I carefully cut out each piece of freezer paper, ensuring all lines are smooth. I cut along the inside of the traced line to ensure an exact size of the fabric piece when it is sewn down. These freezer paper pieces determine the final fabric shape and size so it is important to have them accurate.


Now we are ready for the fun part; choosing your fabrics for your block!

I will be back in a few days with the next steps.

I hope this post is clear and helpful. If you have any questions, please don't hesitate to ask.

Monday, July 9, 2012

The winner announced

I asked my DS  to choose the winner of my giveaway.

The name he drew was Pip. Congratualtions Pip!!!

Thank you to everyone who entered and left a comment.


Wednesday, July 4, 2012

Next Friends of Baltimore block finished.

The Baby Bud Wreath block is done!


I finished the embroidery yesterday. I chose this block because it is one with the least number of pieces and it has no flowers. I needed a rest from lots of tiny petals!

I have 3 blocks finished now.

My next FOB block will be one of the borders. They are very detailed and I don't want to leave them till last.

There are a also few other projects I am doing lots of prep work on at the moment.
More on them soon. :)

There is still time to enter my giveaway here.

Have a great week.

Monday, July 2, 2012

Blogger's Block of the Month and a Giveaway.

I finished my Blogger's BOM blocks this morning. Our designer for June is Pam from Pam Kitty Morning. Once again we have been given a lovely block and great instructions.

My repro block....


...and the bright one.


Now for the giveaway!


I bought 2 of these panels, so I could share one with one of my readers.


The panel is from this collection. (Virginia Quilt Museum - Chintz Medallion by Quilting Treasures)
It measures approx 21" w x 22.75" h.


 Some close ups....


If you would like to win the panel, simply leave a comment and I will randomly choose one winner next Monday, July 9th.

Good Luck!! :)